
First published: 12/6/2023
What better way to enjoy the Christmas season than to gather up your kids and their friends to have some fun creating some crafts for both of your families. Crank up the holiday and music and let Ocean State Job Jot’s Christmas decor help bring in the Christmas spirit. It’s fun, easy, and engaging. Plus, you could teach valuable skills while saving a little making those home decorations and gifts.
In this blog post, we’ll share 10 festive Christmas craft ideas that kids (and adults) of all ages will love. These crafts are simple enough for even the youngest children to do, but they’re also engaging enough to keep older kids entertained. Hopefully, these incredible crafts will become a part of your cherished decorations. Set aside a day to have a crafty morning to start the season off right. Gather your art supplies, put on some Christmas music, and get ready to have some creative fun!

Craft 1: Handprint Christmas Trees
These adorable handprint Christmas trees are a wall-worthy way to capture your child’s growing hands and create a unique holiday keepsake. They’re a quick little project that you can turn into a yearly activity and watch your child’s Christmas tree grow every season!
Instructions:
1. Paint your child’s hand green and press it onto the white paper. Repeat, creating a tree shape.
2. Cut out the handprint tree and glue it onto a piece of craft foam or cardboard.
3. Decorate the tree with glitter, stickers, or other embellishments.
Materials:
• Green paint
• White paper
• Craft foam or cardboard
• Glitter (optional)
Craft 2: DIY Christmas Ornaments
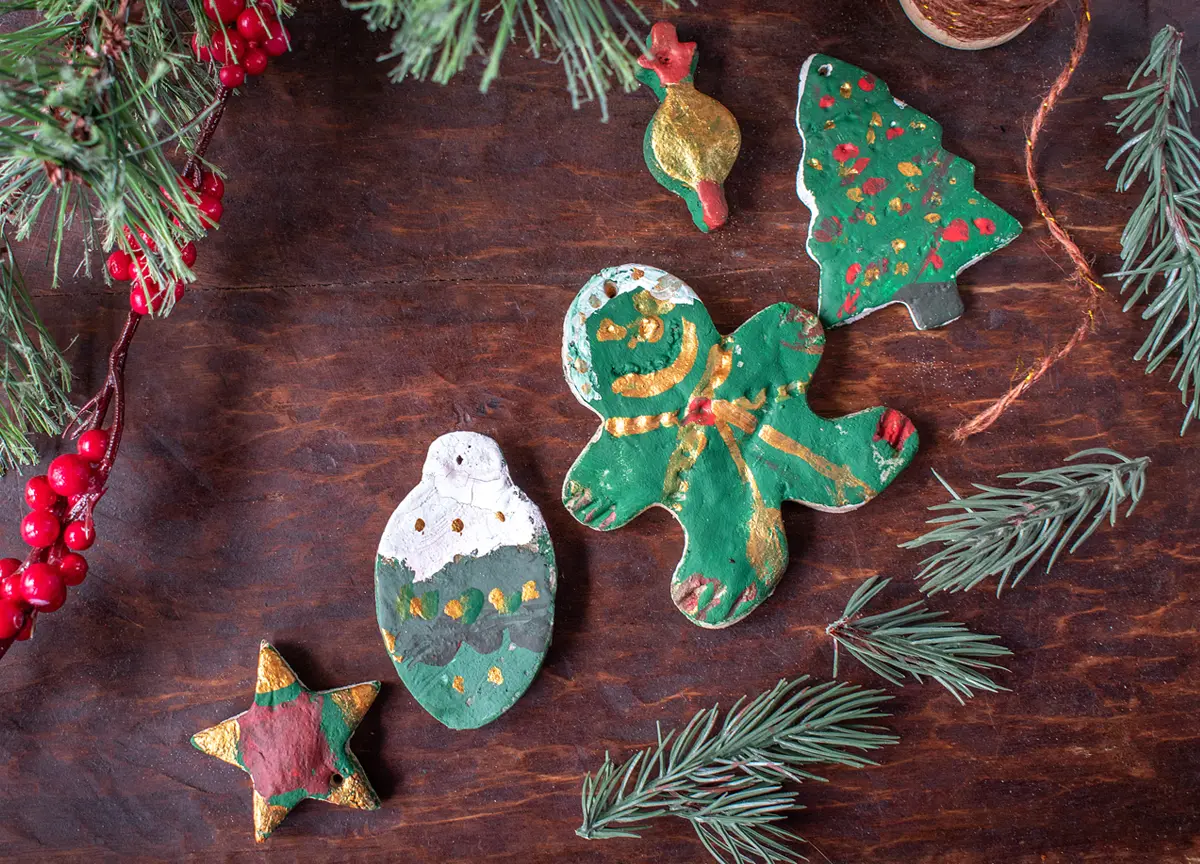
Let your child’s imagination run wild as they create personalized Christmas ornament crafts. Salt dough is a quick-to-make, non-toxic dough that can last for years if cared for properly. This project takes several hours if you bake the ornaments or a couple of days if you decide to air-dry them. Make sure you leave yourself enough time if you’re making these ornaments as Christmas gifts for family and friends.
Instructions:
1. Mix together the salt dough ingredients and stir until a smooth dough forms.
2. Roll out the dough on a floured surface and use cookie cutters to cut out Christmas shapes.
3. Make a hole at the top of each ornament for hanging. A straw makes a perfect circle large enough for the ribbon.
4. Let the ornaments air dry for 24-48 hours or bake them at 200°F for 30 minutes.
5. If you bake your ornaments, let them cool completely before proceeding.
6. Paint the ornaments with acrylic paint and let them dry completely.
7. Thread ribbon through the holes and hang them on the Christmas tree.
Materials:
• Salt dough (recipe: 1 cup flour, 1/2 cup salt, 1/2 cup water)
• Cookie cutters in Christmas shapes
• Acrylic paint and brushes
• Ribbon or yarn for hanging
Craft 2: DIY Christmas Ornaments
Let your child’s imagination run wild as they create personalized Christmas ornament crafts. Salt dough is a quick-to-make, non-toxic dough that can last for years if cared for properly. This project takes several hours if you bake the ornaments or a couple of days if you decide to air-dry them. Make sure you leave yourself enough time if you’re making these ornaments as Christmas gifts for family and friends.
Instructions:
1. Mix together the salt dough ingredients and stir until a smooth dough forms.
2. Roll out the dough on a floured surface and use cookie cutters to cut out Christmas shapes.
3. Make a hole at the top of each ornament for hanging. A straw makes a perfect circle large enough for the ribbon.
4. Let the ornaments air dry for 24-48 hours or bake them at 200°F for 30 minutes.
5. If you bake your ornaments, let them cool completely before proceeding.
6. Paint the ornaments with acrylic paint and let them dry completely.
7. Thread ribbon through the holes and hang them on the Christmas tree.
Materials:
Salt dough (recipe: 1 cup flour, 1/2 cup salt, 1/2 cup water), cookie cutters in Christmas shapes, acrylic paint and brushes, and ribbon or yarn for hanging
Craft 3: Festive Paper Plate Santa
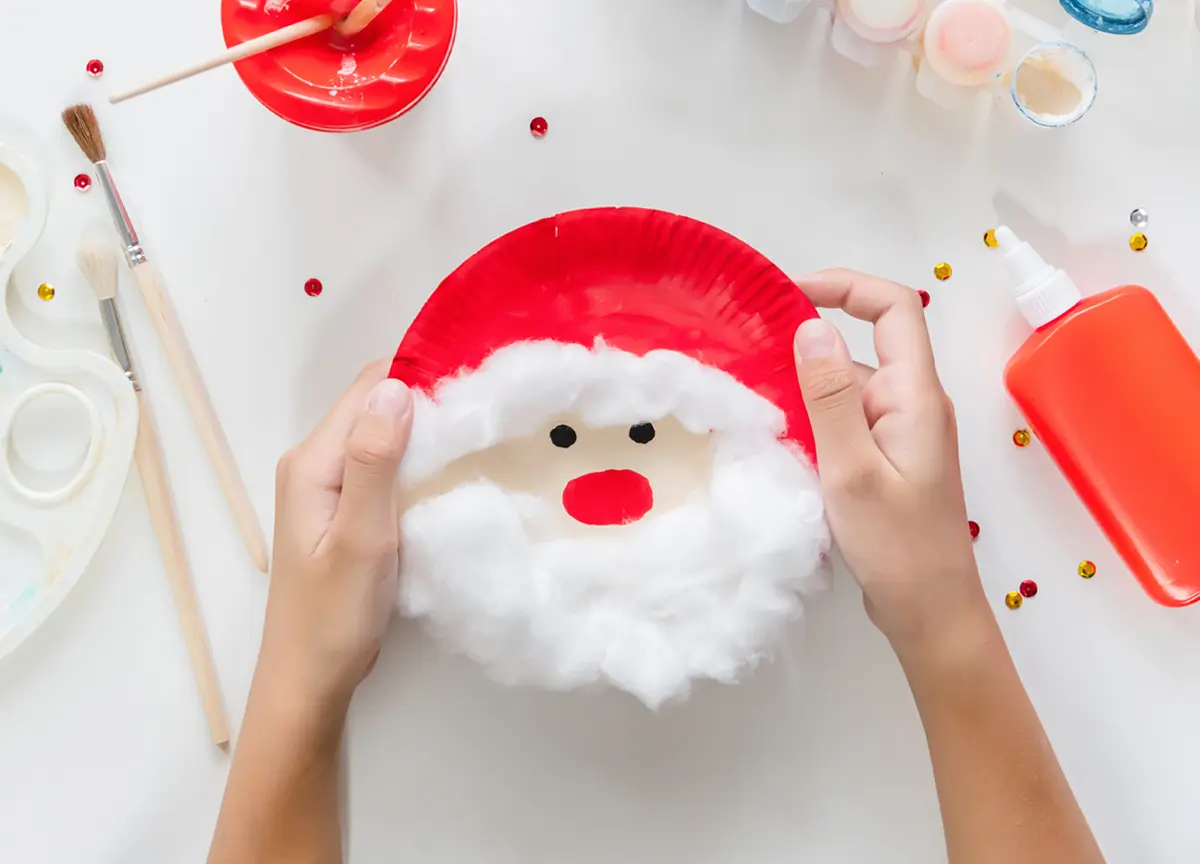
Turn plain paper plates into Holly Jolly Santa Claus faces. They’re quick and easy and you can make more than one to string around the house, using a paper punch to make a hole at the top to slide a piece to string through. Before you know it, you’ll have more Christmas craft than you’ll know what to do with and Santas for everyone!
Instructions:
1. Take a paper plate and paint the top third of the plate red.
2. Use markers (or paints) to draw Santa’s eyes, nose, and mouth.
3. Glue cotton balls around Santa’s beard.
4. Don’t forget to glue a cotton ball on the top of the plate for the pom pom on Santa’s hat!
Materials:
• Paper plates
• Red acrylic paint
• Markers
• Glue
• Cotton balls
Craft 3: Festive Paper Plate Santa
Turn plain paper plates into Holly Jolly Santa Claus faces. They’re quick and easy and you can make more than one to string around the house, using a paper punch to make a hole at the top to slide a piece to string through. Before you know it, you’ll have more Christmas craft than you’ll know what to do with and Santas for everyone!
Instructions:
1. Take a paper plate and paint the top third of the plate red.
2. Use markers (or paints) to draw Santa’s eyes, nose, and mouth.
3. Glue cotton balls around Santa’s beard.
4. Don’t forget to glue a cotton ball on the top of the plate for the pom pom on Santa’s hat!
Materials:
Paper plates, red acrylic paint, markers, glue, and cotton balls

Craft 4: Pinecone Christmas Trees
This craft is a great way to use up pinecones that you’ve collected from your backyard or a park. For a more rustic look, leave the pinecones in their natural brown color. You can also decorate the tree with other festive items, such as ribbons, beads, or small toys.
Instructions:
1. Make sure you lay out some newspaper to protect your work surface. Apply a generous amount of green paint to each pinecone, using a paintbrush to coat all surfaces evenly or leave them brown for a rustic look. Allow the pinecones to dry completely.
2. Add festive touches. Paint red dots onto the pinecones to represent ornaments. Use the cotton balls to create snowdrifts at the base of the tree. Using a small paintbrush, paint the glue onto the tips of the pinecone. Sprinkle glitter over the pinecone to create a snowy look.
3. Top with a star. Take two gold stars and stick them on either side of the top part of the pinecone. If your pinecones don’t have a piece on the top, use a glue gun to adhere a small twig or piece of toothpick to the pinecone.
4. (Optional) Mount the pinecone on a small base like a cork with a glue gun to help it stand up.
Materials:
• Pinecones
• Green paint
• Paintbrush
• White glue
• Gold or white glitter
• Gold star stickers
• Small pieces of twig or toothpicks
• Glue gun (optional)
Craft 4: Pinecone Christmas Trees
This craft is a great way to use up pinecones that you’ve collected from your backyard or a park. For a more rustic look, leave the pinecones in their natural brown color. You can also decorate the tree with other festive items, such as ribbons, beads, or small toys.
Instructions:
1. Make sure you lay out some newspaper to protect your work surface. Apply a generous amount of green paint to each pinecone, using a paintbrush to coat all surfaces evenly or leave them brown for a rustic look. Allow the pinecones to dry completely.
2. Add festive touches. Paint red dots onto the pinecones to represent ornaments. Use the cotton balls to create snowdrifts at the base of the tree. Using a small paintbrush, paint the glue onto the tips of the pinecone. Sprinkle glitter over the pinecone to create a snowy look.
3. Top with a star. Take two gold stars and stick them on either side of the top part of the pinecone. If your pinecones don’t have a piece on the top, use a glue gun to adhere a small twig or piece of toothpick to the pinecone.
4. (Optional) Mount the pinecone on a small base like a cork with a glue gun to help it stand up.
Materials:
Pinecones, green paint, paintbrush, white glue, gold or white glitter, gold star stickers, small pieces of twig or toothpicks, and glue gun (optional)
Craft 5: Cotton Ball Snowman Ornaments
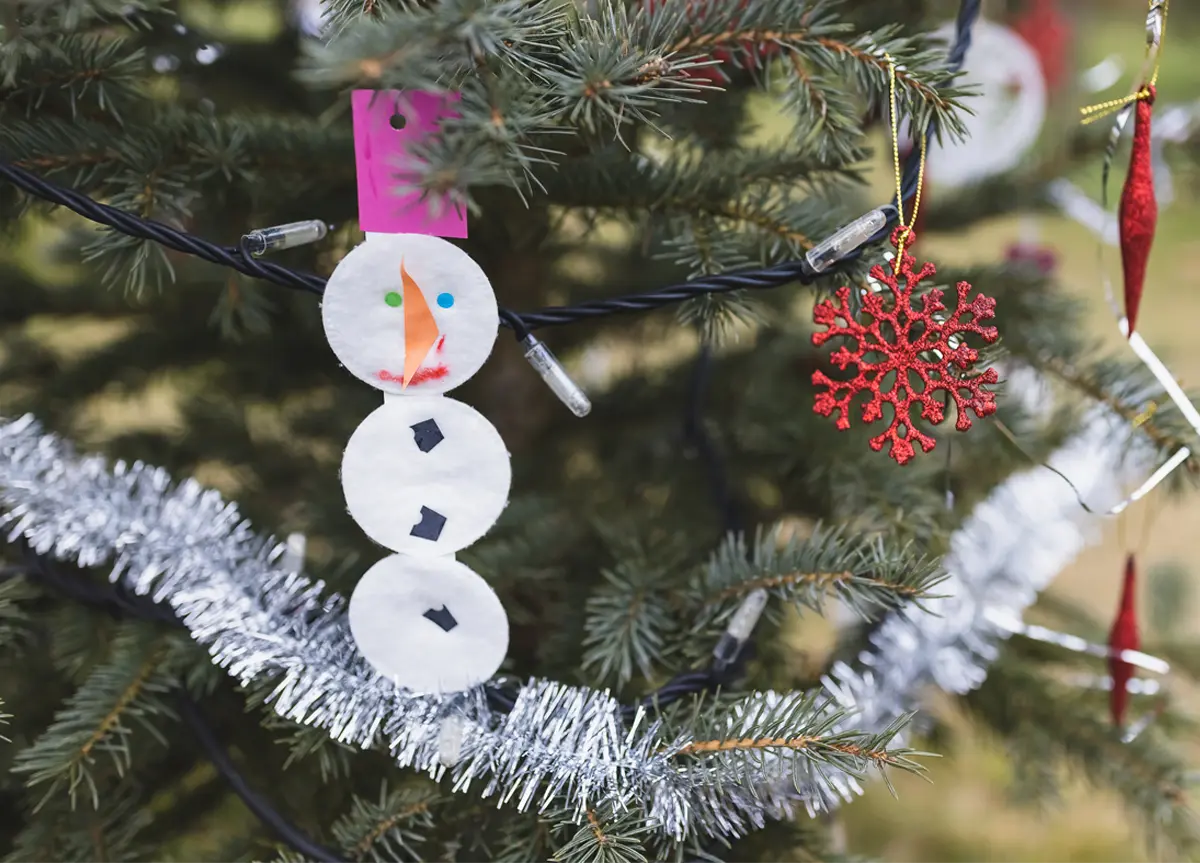
Build a fluffy snowman craft with cotton balls and simple materials. This is an easy Christmas craft that requires minimal cutting or none at all. Younger kids can draw and glue this craft easily, while older kids can use scissors to cut the snowman’s features out of construction paper.
Instructions:
1. Roll three cotton balls into different sizes for the snowman’s body. You can also use round cotton pads.
2. Glue the cotton balls or rounds together.
3. Cut out two eyes and a mouth from black construction paper and a carrot-shaped nose from orange paper. Glue them onto the snowman’s head. You can also use markers instead of cutting paper.
4. Glue ribbon from the top of the snowman to hang from the tree.
Materials:
• Cotton balls or cotton pads
• Black construction paper
• Orange construction paper
• Glue
• Ribbon for hanging
• Optional: Markers or crayons
Craft 5: Cotton Ball Snowman Ornaments
Build a fluffy snowman craft with cotton balls and simple materials. This is an easy Christmas craft that requires minimal cutting or none at all. Younger kids can draw and glue this craft easily, while older kids can use scissors to cut the snowman’s features out of construction paper.
Instructions:
1. Roll three cotton balls into different sizes for the snowman’s body. You can also use round cotton pads.
2. Glue the cotton balls or rounds together.
3. Cut out two eyes and a mouth from black construction paper and a carrot-shaped nose from orange paper. Glue them onto the snowman’s head. You can also use markers instead of cutting paper.
4. Glue ribbon from the top of the snowman to hang from the tree.
Materials:
Cotton balls or cotton pads, black construction paper, orange construction paper, glue, ribbon for hanging, and markers or crayons (optional)

Craft 6: Pipe Cleaner Candy Canes and Angels
Create fun and festive candy canes, angels, and more using pipe cleaners, sleigh bells, a little glue, and some ribbon. These look great on the Christmas tree or taped onto a present for a little extra cheer.
Instructions:
Candy Canes
1. Take two or three pipe cleaners of different colors and twist them together. Form into a candy cane shape.
2. Using some ribbon, tie a bow around the neck of the candy cane or tie a small loop at the top to hand from your tree.
3. You can also add sleigh bells and glue sequins or other embellishments to the candy cane for more sparkle.
Angels
1. Take one pipe cleaner and shape it into the angel’s gown.
2. Shape a different pipe cleaner into a circle and twist once in the middle to make the wings. For larger wings, use two pipe cleaners and twist in the middle to join.
3. Connect the body and the wings by either gluing the two together or twisting them to join.
4. Glue a pompom head to the wings.
5. Make a halo from another pipe cleaner and glue it to the back of the angel’s head.
6. Add ribbon bows, bells, or other embellishments to your angel to make them truly special!
Materials:
• Colorful pipe cleaners
• Sleigh bells
• Ribbon
• Crafting pompoms
• Glue
• Scissors
Craft 6: Pipe Cleaner Candy Canes and Angels
Create fun and festive candy canes, angels, and more using pipe cleaners, sleigh bells, a little glue, and some ribbon. These look great on the Christmas tree or taped onto a present for a little extra cheer.
Instructions:
Candy Canes
1. Take two or three pipe cleaners of different colors and twist them together. Form into a candy cane shape.
2. Using some ribbon, tie a bow around the neck of the candy cane or tie a small loop at the top to hand from your tree.
3. You can also add sleigh bells and glue sequins or other embellishments to the candy cane for more sparkle.
Angels
1. Take one pipe cleaner and shape it into the angel’s gown.
2. Shape a different pipe cleaner into a circle and twist once in the middle to make the wings. For larger wings, use two pipe cleaners and twist in the middle to join.
3. Connect the body and the wings by either gluing the two together or twisting them to join.
4. Glue a pompom head to the wings.
5. Make a halo from another pipe cleaner and glue it to the back of the angel’s head.
6. Add ribbon bows, bells, or other embellishments to your angel to make them truly special!
Materials:
Colorful pipe cleaners, sleigh bells, ribbon, crafting pompoms, glue, and scissors
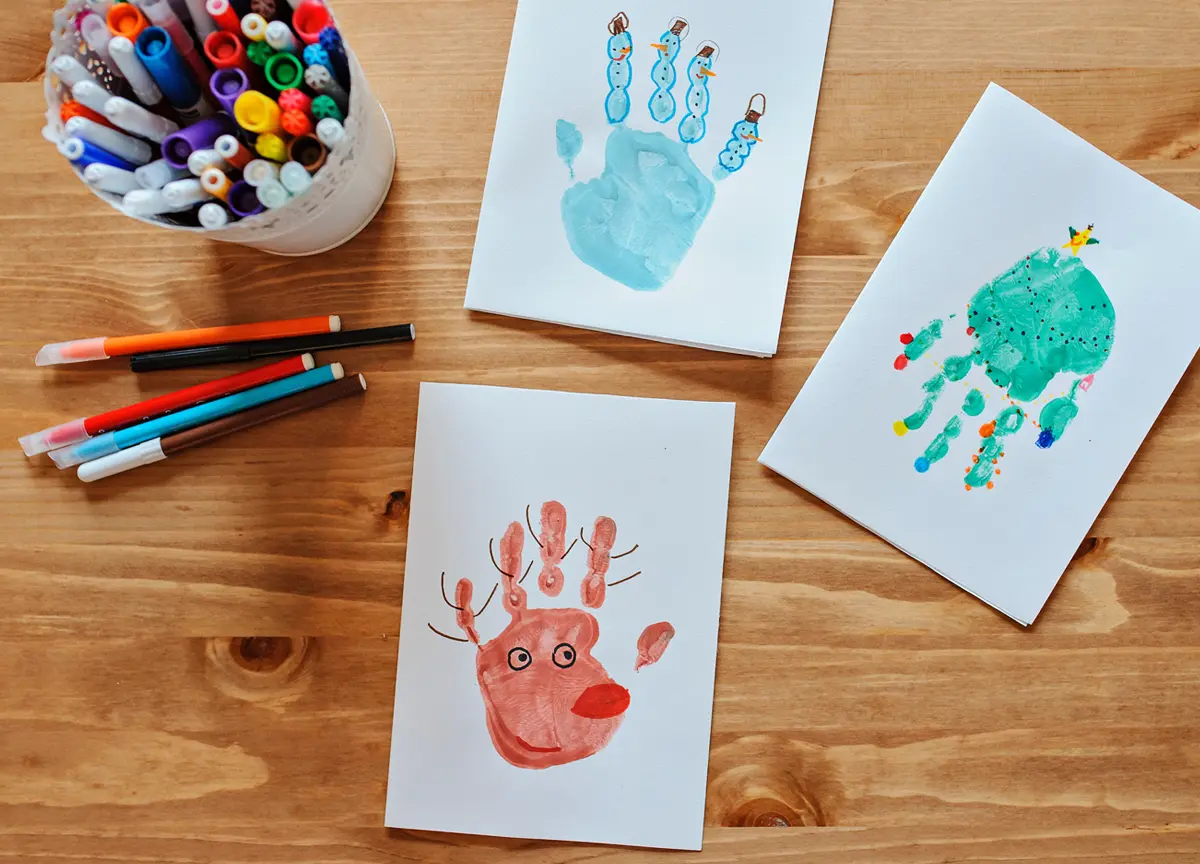
Craft 7: Reindeer Handprint Art
Transform your child’s handprints into adorable reindeer crafts with this simple and fun activity. To make a fun Christmas card for family and friends, make a handprint reindeer and then make color copies on cardstock, folding the paper in half to create a card everyone will love.
Instructions:
1. Paint your child’s hand brown and press it onto the paper, creating a reindeer head shape.
2. Using the markers, have your child draw a face on the reindeer handprint.
3. Glue a red pompom to the reindeer’s nose and use googly eyes to add a multi-dimensional effect to your child’s reindeer.
6. Add ribbon bows, bells, or other embellishments to your angel to make them truly special!
Materials:
• Brown paint
• Paper
• Glue
• Scissors
• Markers
• Red pompom and googly eyes (optional)
Craft 7: Reindeer Handprint Art
Transform your child’s handprints into adorable reindeer crafts with this simple and fun activity. To make a fun Christmas card for family and friends, make a handprint reindeer and then make color copies on cardstock, folding the paper in half to create a card everyone will love.
Instructions:
1. Paint your child’s hand brown and press it onto the paper, creating a reindeer head shape.
2. Using the markers, have your child draw a face on the reindeer handprint.
3. Glue a red pompom to the reindeer’s nose and use googly eyes to add a multi-dimensional effect to your child’s reindeer.
6. Add ribbon bows, bells, or other embellishments to your angel to make them truly special!
Materials:
Brown paint, paper, glue, scissors, markers, red pompom, and googly eyes (optional)
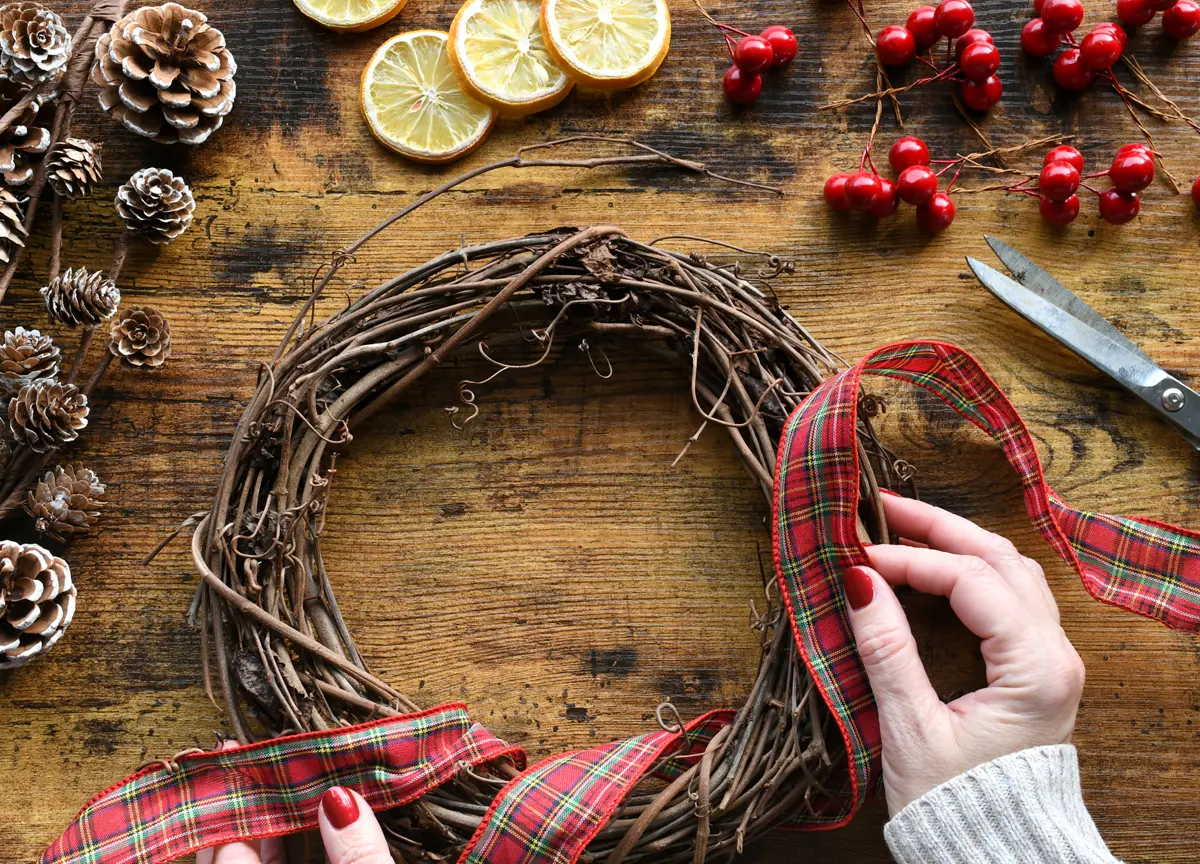
Craft 8: Christmas Wreath Masterpieces
Create beautiful and festive Christmas wreaths with a variety of materials. This Christmas wreath craft is a bit involved and might be better for older children or arty crafty kids with more experience.
Instructions:
1. Choose a grapevine wreath as your base.
2. Attach pine cones to the wreath using a glue gun.
3. Tie ribbon around the wreath, leaving some tails hanging down.
4. Add ornaments to the wreath for extra decoration.
Materials:
• Grapevine wreaths
• Pine cones
• Ribbon
• Scissors
• Glue gun
• Ornaments (optional)
Craft 8: Christmas Wreath Masterpieces
Create beautiful and festive Christmas wreaths with a variety of materials. This Christmas wreath craft is a bit involved and might be better for older children or arty crafty kids with more experience.
Instructions:
1. Choose a grapevine wreath as your base.
2. Attach pine cones to the wreath using a glue gun.
3. Tie ribbon around the wreath, leaving some tails hanging down.
4. Add ornaments to the wreath for extra decoration.
Materials:
Grapevine wreaths, pine cones, ribbon, scissors, glue gun, and ornaments (optional)
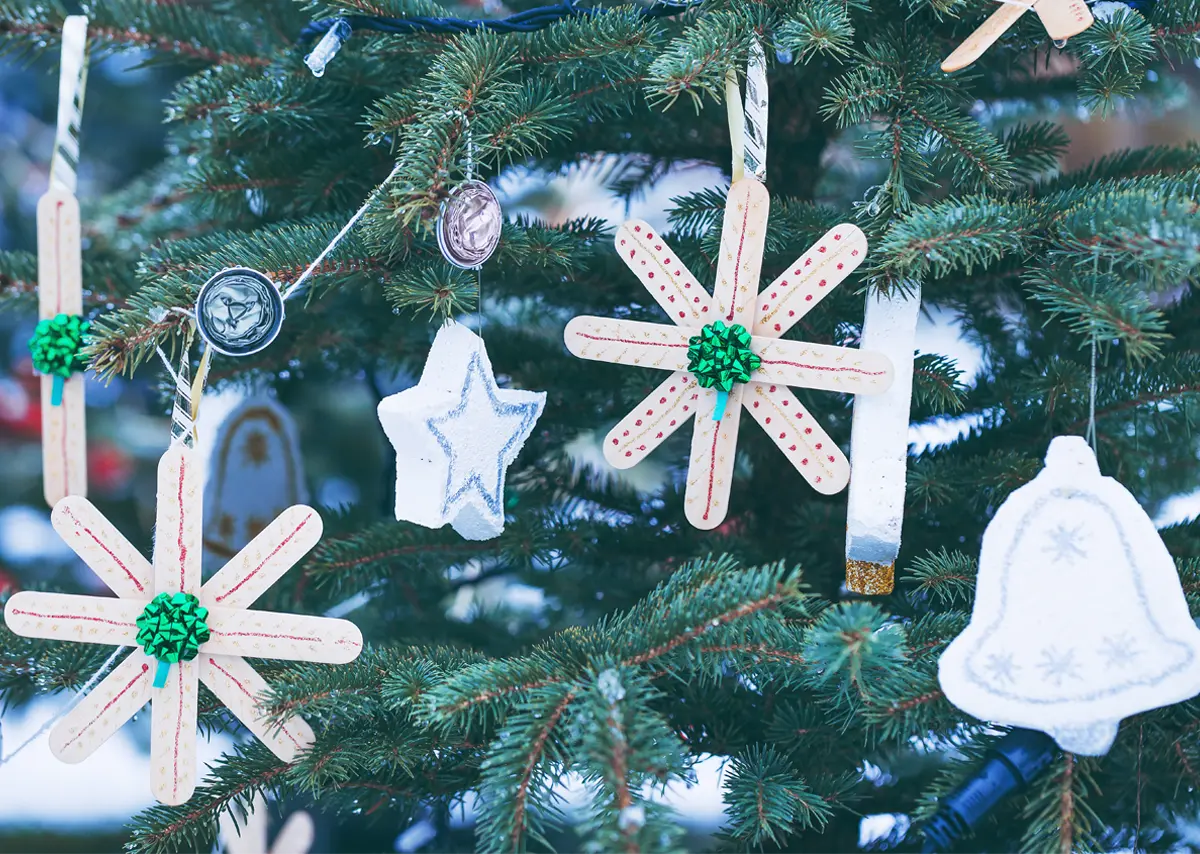
Craft 9: Snowflake Magic with Popsicle Sticks
Create delicate and unique snowflakes using popsicle sticks and paint.
Instructions:
1. Paint popsicle sticks with different colors of acrylic paint.
2. Let the paint dry completely.
3. Arrange the painted popsicle sticks into snowflake shapes.
4. Glue the popsicle sticks together to secure the snowflake shape or wrap the popsicle sticks with twine and tie it in a knot. You can also use mini bows to add more color.
5. Sprinkle glitter over the snowflakes for a sparkling effect.
Materials:
• Popsicle sticks
• Acrylic paint
• Glue, twine, ribbon, or bows
• Glitter
Craft 9: Snowflake Magic with Popsicle Sticks
Create delicate and unique snowflakes using popsicle sticks and paint.
Instructions:
1. Paint popsicle sticks with different colors of acrylic paint.
2. Let the paint dry completely.
3. Arrange the painted popsicle sticks into snowflake shapes.
4. Glue the popsicle sticks together to secure the snowflake shape or wrap the popsicle sticks with twine and tie it in a knot. You can also use mini bows to add more color.
5. Sprinkle glitter over the snowflakes for a sparkling effect.
Materials:
Popsicle sticks, Acrylic paint, Glue, twine, ribbon, or bows, and glitter
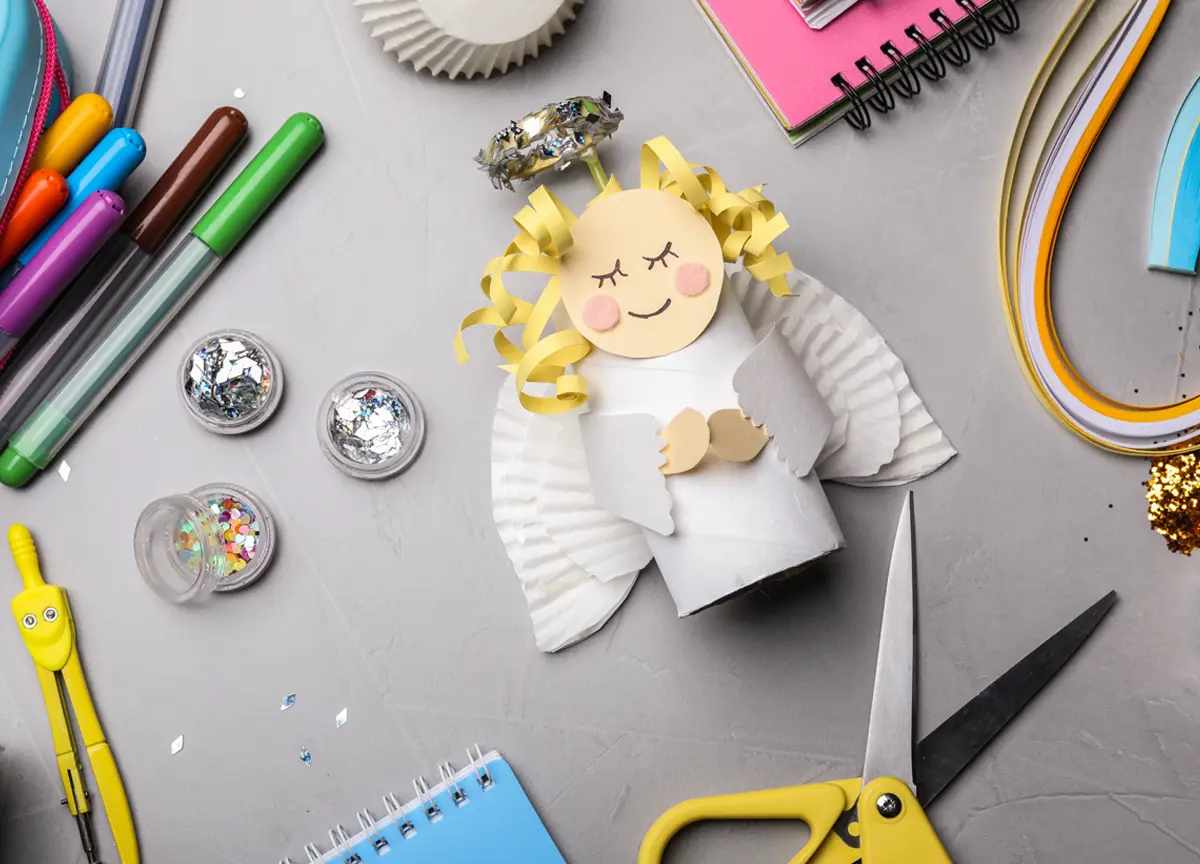
Craft 10: Paper Tube Angel
Create a simple angel ornament from a toilet paper or paper towel tube.
Instructions:
1. Cut your toilet paper or paper towel tube in halves depending on how big you want your angel.
2. Wrap your tube in white construction paper and glue the edges.
3. Cut out wings, head, and small hands from the construction paper.
4. Glue the wings, head, and hands onto the tube.
5. Form a halo from a pipe cleaner and glue it to the angel’s head.
6. Use markers or crayons to draw the angel’s eyes, nose, and mouth.
7. Add embellishments to the angel, such as glitter, feathers, or ribbons.
Materials:
• Toilet paper tube or paper towel tube
• White construction paper
• White yarn
• Gold pipe cleaners
• Scissors
• Glue
• Markers or crayons
• Embellishments (optional)
Craft 10: Paper Tube Angel
Create a simple angel ornament from a toilet paper or paper towel tube.
Instructions:
1. Cut your toilet paper or paper towel tube in halves depending on how big you want your angel.
2. Wrap your tube in white construction paper and glue the edges.
3. Cut out wings, head, and small hands from the construction paper.
4. Glue the wings, head, and hands onto the tube.
5. Form a halo from a pipe cleaner and glue it to the angel’s head.
6. Use markers or crayons to draw the angel’s eyes, nose, and mouth.
7. Add embellishments to the angel, such as glitter, feathers, or ribbons.
Materials:
• Toilet paper tube or paper towel tube, white construction paper, white yarn, gold pipe cleaners, scissors, glue, markers or crayons, and embellishments (optional)
Safety Tips and Preparation for Christmas Crafting
When crafting with kids, it’s important to follow safety guidelines to ensure a fun and safe experience.
• Choose age-appropriate crafts: Make sure the crafts you select are appropriate for your child’s age and skill level.
• Supervise closely: Always supervise children closely when they are crafting, especially when using materials like scissors or glue.
• Use safe materials: Choose non-toxic materials that are safe for children to use.
• Clean up spills: Clean up any spills or messes immediately to prevent accidents.
Cherishing Holiday Memories
Christmas crafts are a wonderful way to spend time with your children, create lasting memories, and get into the holiday spirit. These 10 festive Christmas craft ideas for kids are just a starting point. Our blog post, Five DIY Christmas Ornaments to Make Your Tree Shine: A Family Project, offers even more DIY Christmas fun. There are endless possibilities for creating unique and fun crafts with your little ones. So, stop by your local Ocean State Job Lot for all your Christmas supplies, put on some Christmas music, and let your creativity flow!